
There and Back Again: Returning to Mac After Over 20 Years On Windows
In a previous post, I wrote:
Peanut butter and jelly. Abbott and Costello. Lennon and McCartney. iPhone and macOS. Android and Windows. Some pairings just work well together. How about iPhones and Windows computers? That’s more like peanut butter and hummus. I like each of them by themselves, but, mixed together, they leave much to be desired.”
Yet, I stubbornly clung to Windows computers for the longest time, even though I’m an avid iPhone and iPad user. I got my first iPhone around 2008 when I ditched my Motorola Q for an iPhone 3G. My first tablet was an iPad 3 in 2012. Apple introduced “Continuity” in 2014 — an ever-growing set of features that allow seamless interaction between their mobile and computing devices. But even Continuity wasn’t enough to lure me to a Mac.
It wasn’t always this way…
Of the Beginning of Days

After growing up using Commodore and Atari computers, the first PC I bought with my own money (as a college student) was a “Macintari” in 1987. Proper Macs were super expensive, so instead, I purchased a Mega ST series Atari computer, which ran the same CPU as Macs of that era (the Motorola 68000). If you installed a Macintosh ROM (or EPROM) chip, you could boot into Macintosh System Software (as macOS was known at the time) and use the Atari hardware as if it were a “real” Apple Macintosh computer. I’m unsure how legal that was, but the shady Atari dealer in Berkeley, California, wasn’t shy about pushing this option.

The machine gave me the best of both worlds. When running its native OS, the Atari was great for gaming and could also run Microsoft Word (yes, written for Atari). When booting into the EPROM chip, I had the equivalent of a Macintosh in the heyday of “Classic Mac OS.” Eventually, I’d run the machine exclusively in Mac mode.
In 1995, during Apple’s “Dark Ages” and death spiral, I finally bought a bonafide Mac: a Power Macintosh 6100. I used that computer for over seven years, thanks to later hardware upgrades from NewerTechnology (a RAM upgrade from 8MB to 64MB and a “MAXpowr G3 240” chip upgrade card).

Throughout the 1990s, I happily used Macs at home and work, including four years at Genentech, which nearly exclusively used Apple computers (a corporate rarity back then). My first exposure to Microsoft’s competing OS was Windows 95. I took a training course at Genentech when I got assigned to a department that also used PCs.
An Unexpected Parting
In 2000, during the dot-com boom, I joined a web startup that developed its product in Microsoft Active Service Pages (and later ASP.NET). And — egads! — I had to use a Windows computer at work. I used PCs at that job for the next 15 years, so my expertise in Windows eventually grew deep.
When it was finally time to retire my souped-up PowerMac 6100 in 2002, replacing it with a Windows computer made the most sense. I had never used Mac OS X (which wasn’t compatible with my Mac). Why learn a new OS when I was already comfortable with Windows from my work experience?
The Three Towers

For the next 22 years, I stuck with Windows computers at home and became a power user.
I started with an HP Pavilion desktop tower.

Subsequently, I owned two Dell XPS desktop towers and then a Dell XPS 15 laptop.
During the last three years of my tech career, from 2015 to 2018, I changed companies and had to switch to a MacBook at work. I became proficient in macOS X but still preferred Windows.
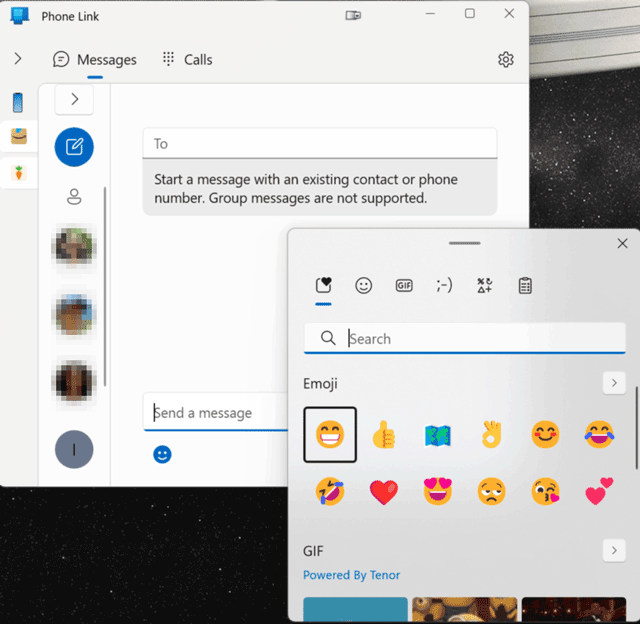
Except for one thing: I was insanely jealous of the ability to run Messenger on a Mac computer (a feature Apple introduced in 2012).
I hate typing on iPhone keyboards. Maybe it’s because I have big thumbs or that as a Gen Xer, I’m far from a digital native. Whatever the reason, I avoid the activity as much as I can. I’m far more comfortable typing on an iPad keyboard, but I’ll choose my computer keyboard every time if I have a choice.
For longer replies in Messages, I would often compose my message on my computer, email it to myself, and then copy and paste it from the Mail app on my iPhone into the Messages app.
As a Windows user, I’d have to live with this frustration indefinitely unless I considered one of the following options:
- Switching to Android (which better integrates with Windows).
- Finding a hack or end-around to use Messages on Windows.
- Switching to a Mac (or running a Mac alongside my PC).
#1 was a no-go. I had to use Android phones at work for software testing. They were fine, but I much prefer iPhones. Plus, my entire family uses iPhones and iPads, so we’re heavily invested in the Apple ecosystem (family sharing, Find My, etc.).
#2 was my solution for a couple of years. I first adopted Intel’s Unison app to improve the interoperability between my iPhone and Windows computer. The app allowed me to reply to Apple messages from my Dell laptop (in addition to offering a few other integrations). However, it was buggy and had several limitations, including not supporting group chats. Eventually, I switched to Microsoft Phone Link, which had similar features and limitations but was more stable and generally worked better on my PC.
For a summary of all the options I considered, see my 2023 post: Using Apple Messages on a Windows PC Is Challenging But Getting Easier
I’d periodically consider #3: switching to a Mac. In July 2022, I even created a “MacBook Laptop” note in Evernote to start tracking all the “migration” issues I’d have to resolve if I were to make the change. Some items on the list were simple (e.g., apps available for both operating systems like Excel and Photoshop Elements). However, I also came up with a long list of friction points that didn’t have easy answers. I concluded that transferring over two decades of computing habits to a different operating system would be a huge effort. Among other things, I’d have to:
- Find a calendar program that would function just the way I like.
- Identify a Stickies program as capable as the one I used in Windows.
- Formulate a new backup routine.
- Give up portable apps (which I used whenever possible on Windows to minimize operating system bloat).
- Live without the convenience of progressive web apps (which Windows can install as standalone apps that run in a dedicated window and appear in the taskbar and startup menu).
- Overcome my fear of potentially complicated data migrations (e.g., my Adobe Organizer photo library, my Thunderbird profile, my calendar data, and more).
- Abandon a 22-year investment in Windows expertise and start over as a new(ish) macOS user.
- Give up a stubborn belief that I preferred Windows over macOS (which — spoiler alert — turned out to be erroneous).
Whenever I reviewed my Windows-to-Mac “laundry list,” I’d throw up my hands and decide to stick with Windows.
What changed?
Three things. First, I eventually hit the limit of my frustration over the lack of a proper Messenger experience on my Dell laptop. Second, Apple continued to iterate on its Continuity features; the June 2024 WWDC announcement of iPhone Mirroring on macOS would be another compelling feature I’d miss out on as a Windows user. Third, rumors surfaced that Apple would release M4 MacBook Pros in late 2024, which would allow me to buy a Mac at the beginning of an upgrade cycle.
The Return of the Mac

In the summer of 2024, industry pundits predicted that Apple would release M4 MacBook Pros in the fall, and I began planning my migration from Windows to macOS in earnest.
Research & Planning
Before ordering my Mac, I utilized several resources to investigate options to replace the critical apps on my PC.
As I’ve mentioned, I had used a MacBook Pro for three years at work (until mid-2018), so I was hardly starting from scratch. Additionally, for the entire time I was a Windows user, I still subscribed to TidBITS (a long-standing Apple news site) to follow iPhone and iPad news and, peripherally, Mac news. I also subscribed to MacWorld’s RSS feed and sometimes read CNET’s Apple coverage.
Hence, I already had rudimentary knowledge of macOS. Even so, I needed to get into the weeds to make sure no undiscovered land mines lay in my Windows-to-macOS migration path.
Around this time, I started favoring ChatGPT as a research tool over Google searches. Even with the need to sometimes vet its answers, ChatGPT dramatically accelerated the pace of my research. After I got my Mac, I installed the ChatGPT desktop app and started relying on it even more. What can I say? I’m a convert.
While looking for Mac video tutorials, I discovered another invaluable resource: Gary Rosenzweig’s MacMost YouTube channel. Rosenzweig’s polished and professional tutorials cover topics from the most basic to the most obscure (not only about macOS but also about iOS and more).
Finally, I occasionally used my son’s MacBook Air for quick test drives of Mac apps.
By the time I received my Mac (in November 2024), I had created a detailed migration plan in Evernote with step-by-step details for app installations and OS configurations. My goal was to switch from the Dell laptop to the MacBook Pro quickly to minimize the transition period, during which I’d have one foot in Windows 11 Pro and another in macOS.

Setting Up My New Mac
Below is a summary of how my best-laid plans worked out in practice once I started customizing my Mac.
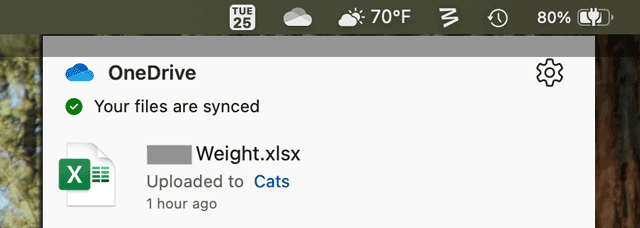
Cloud Storage
I planned to continue using OneDrive as my primary cloud storage. My Microsoft 365 family plan offers the full Office application suite along with 1 TB of data per family member. While I do use other cloud services peripherally (including iCloud+ for additional iPhone storage for my daughter), I couldn’t see any reason to shake things up in this area.
The result: OneDrive works seamlessly on my Mac, just as it had on my PC.
Calendar App
I rely heavily on my calendar app to manage my personal life, home maintenance, family activities, etc. In addition to appointments, I store all sorts of one-time and recurring tasks in my calendar.
For me, the key feature in a calendar app is not the user interface for the various views (which are similar in most programs) but the reminder UI. All the calendar apps I’ve relied on for desktop computing have featured dedicated reminder windows that show all due (and overdue) reminders in one centralized alert box.
At work, most of my employers used Microsoft Outlook, which handled reminders this way. The couple of times I had to use Google Calendar, I hated how it uses native OS notifications and sought out Chrome extensions that could centralize the reminders.
At home, my first calendar app was Now-Up-to-Date on Classic Mac OS, which also had a centralized reminder system. When I moved to a PC and looked for a similar solution on Windows, I found EssentialPIM — a robust personal info manager that I adopted for contacts and calendaring (but not for email, tasks, notes, or its other myriad features).

Initially, I couldn’t find a macOS calendar program with this feature. I nearly gave up and resigned myself to using Apple Calendar with standard macOS notifications. This change would’ve disrupted my habits in a big way; the idea alone made me anxious about missing appointments and tasks.
Luckily, I took a deeper look at BusyCal and discovered it has a setting to use an “Alarm Window” instead of Notification Center. Oddly, all my web searches and AI queries for “macOS calendars with alert windows” had not uncovered this tidbit.
After several months, I couldn’t be happier with BusyCal. The calendar UI is clean, easy to read, and a nice upgrade from EssentialPIM. The free version is powerful and flexible, with more features than I need. Most importantly, the reminder system works exactly as I need it to.
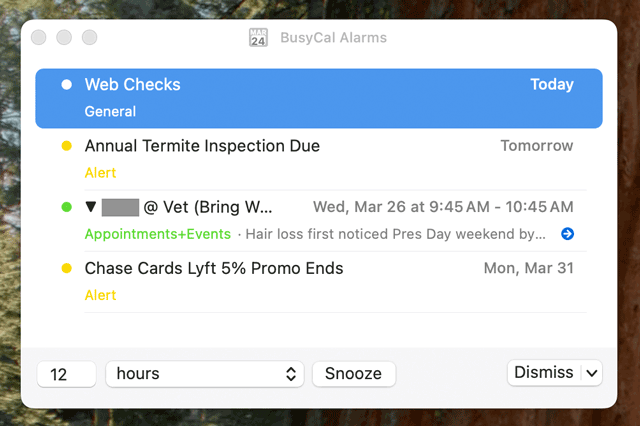
Note: My BusyCal calendars sync to iCloud, which means I can open them in any compatible calendar client. So, on my iPhone and iPad, I simply use Apple’s native Calendar app since I don’t need any of the special features in BusyCal’s mobile apps (which are not free).
Eventually, I may pay for either the Mac or mobile version of BusyCal to support Beehive Innovations, which develops the app.
While writing this post, I learned that the team behind Now Up-to-Date originally developed BusyCal. So, I guess I’ve come full circle.
For my personal email, I’m a holdout and still prefer using a dedicated desktop email program instead of a web app. I started with Eudora on Classic Mac OS but moved to Thunderbird for the over 20 years I was on Windows.
My initial plan for macOS was to continue using Thunderbird. However, despite having moved my profile between computers numerous times before, I ran into some issues while copying it from Windows to Mac. My profile includes local email messages going all the way back to 1995 (primarily from before I switched from POP to IMAP).
While struggling with profile migration, I had a brainstorm — a super obvious idea I hadn’t considered. Why not use Apple’s email client? After all, it’s the same one I use every day on my iPhone and iPad.
I configured my email addresses in Apple Mail and found it to function just like Thunderbird but with a user interface more congruous with iOS and iPadOS.
This didn’t solve my offline email archive problem, but after more trial and error, I finally got a copy of my Windows Thunderbird profile to work with Thunderbird for macOS.
In the end, I settled on using Apple Mail as my daily driver, and I open Thunderbird only when I need to search for something in my historical POP message archives.

Contacts
Previously, I’d used Now Contact in Classic Mac OS and EssentialPIM in Windows; both offered powerful and customizable contact management. In the latter, I’d sync my contacts and calendar to my Google account, which made them available on my mobile devices.
Nowadays, my contact list is smaller, and my needs are simpler. So, this was an easy migration to plan. I’d sync my contacts from EssentialPIM to iCloud and start using Apple Contacts. I did have to manually enter some data in custom fields that didn’t sync over, but otherwise, this transition went smoothly.
Sticky Notes
Finding a sticky notes program on the Mac doesn’t seem like it should be a big deal. Apple offers a native app (as does Windows).
However, I’m a heavy user of sticky notes and fussy about the features I expect, thanks to using Zhorn Software’s Sickies program on Windows for countless years.
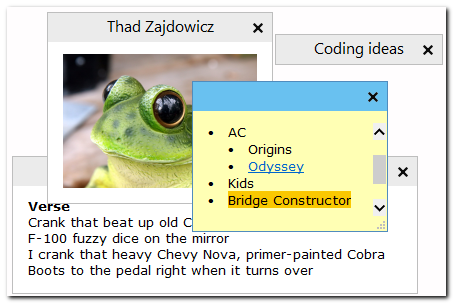
The Stickies feature set and its customization options are hard to find in any other sticky notes app (whether in Windows or macOS).
- Dedicated title bar text (i.e., title text is distinct from the first line of the note).
- Notes that auto-size as you type (you can also double-click on the bottom right corner to optimize a note’s size based on its contents).
- Find text in a note.
- An option to bring all notes to the front if you click on any single note.
- Rich text formatting.
- Support for links and images.
- Notes can collapse down to their title bars.
- Individual notes can be set to stay on top of all other apps.
- A notes organizer for managing notes in a single interface.
- Easy backup options.
- Much more (including many features I never used).
I tried out numerous sticky note apps on macOS before finding one that offered about 80% of my desired feature set and would be an acceptable replacement for Stickies.
The finalist was Stick-ies from Ashvin Suthar (available in the Mac App Store). It’s missing a few features, but it’s sufficient for my needs and has a user interface that’s more elegant than other options I tried.

(I’ll discuss “regular” Notes apps later in this post.)
Photo Management & Editing
While a relatively new Windows user in late 2004, I switched to a digital camera. I had learned Adobe Photoshop on Classic Mac OS, so while fishing for a photo editing and management tool in Windows, Adobe Photoshop Elements was an obvious front-runner. The editor had the core Photoshop tools I needed to edit family photos (and to optimize graphics for my websites). Plus, the program offered an Organizer for managing photos using albums, folders, and tags.
By the time I was getting ready to purchase my MacBook Pro, I had been using various versions of Adobe Photoshop Elements for 20 years. As much as I wanted to consider using the free and native Apple Photos app, I knew it wasn’t an option.
I have over 14,000 photos in my Organizer, and no direct tool or method exists to migrate catalogs between Photoshop Elements and Apple Photos. So, sticking with Photoshop Elements on macOS was the obvious and (hopefully) easy choice.
I had some trepidation because the last time I’d moved my catalog between Windows computers had been trickier than expected. This time, I’d be moving from PSE 2022 for Windows to PSE 2025 for macOS.
Much as I feared, the data migration didn’t go smoothly. The program’s backup and restore method failed. Instead, I had to experiment with manually copying over my catalog and photos and then converting the catalog format from 2022 to 2025. Eventually, I stumbled on a sequence of steps where everything migrated correctly.
All my photos, albums, tags, and metadata now surface correctly in Adobe Elements Organizer on my Mac (i.e., nothing got lost in translation). As a bonus, I also got all the feature updates from the 2023, 2024, and 2025 versions with my upgrade — not to mention that PSE finally displays correctly on my external 4K monitor (an area where the Windows version had issues).
Text Editor
Finding a plain text editor is another task that doesn’t seem like it would be a huge lift. On Windows, I used Notepad++ — a free, well-regarded text editor with powerful search and replace, syntax coloring for programming code, and many more advanced features.
In my previous experience with macOS (at my jobs), I had never found a free option I loved (having tried TextEdit, Sublime Text, Atom, and others). While researching apps again, I ran across many of the same programs, as well as CodeEdit (which is free and open source). However, before trying them out, I watched a MacMost video in which Gary Rosenzweig recommended the free app CotEditor.
Since MacMost had become a trusted resource, I flagged CotEditor as my front-runner. After trying it out on my Mac, my search was done. (Thanks, Gary.)

Notes Apps
On Windows, in addition to Stickies (discussed earlier), I used Evernote and Google Keep for different kinds of notes. Evernote served as my knowledge base, and I used Keep for simple notes like shopping lists.
Keep has mobile apps for iPhone and iPad and is web-based on computers. I like the checklist handling in Keep better than in Apple Notes. So, I had no reason to rock the boat while crossing the river to macOS.
I’ve been a paid Evernote user for well over a decade. The program has had its ups and downs, and periodically, I’ve considered replacing it. Previously, I had ruled out OneNote (I hate the interface), Joplin (no web client), and Notation (overkill/too complicated).
After getting my Mac, I tried two more options:
Apple Notes
I really wanted to see if I could migrate from Evernote to Apple Notes. Although not as powerful or flexible as Evernote, I could envision using it if I were starting from scratch. However, when I tried importing one of my Evernote notebooks, I ran into too many formatting problems, including:
- The imported notes had small font sizes and extra spaces around each bullet in lists (i.e., ruining the formatting).
- Text highlights didn’t import. (I highlight text a lot in Evernote.)
Bear Note
Bear Note isn’t available for Windows, so I hadn’t previously tried it. I immediately ran into some blockers:
- The program uses tags instead of folders, which would be a disruptive change. (Evernote can use both, and I primarily rely on folders to organize my notes.)
- As with Apple Notes, text highlight colors failed to import.
- Surprisingly, Bear Note doesn’t offer colored text (a feature I use extensively in Evernote).
For these reasons, I decided once again to stick with Evernote. My annual premium is relatively low since I’m grandfathered into an older plan. The good news is that Evernote has been releasing software updates more frequently since Bending Spoons acquired the program in early 2023.
Even so, I’ve started using Apple Notes for some notes, especially ones I want to share with family members (a handy option since we all have iPhones).
Screenshot Capture & Annotation
On Windows, I was in mad love with my screenshot and annotation tool, PicPick. Free for personal use, the program offers all the screen capture options you’d expect, as well as powerful annotation tools and numerous additional built-in utilities (a color picker, pixel ruler, etc.).
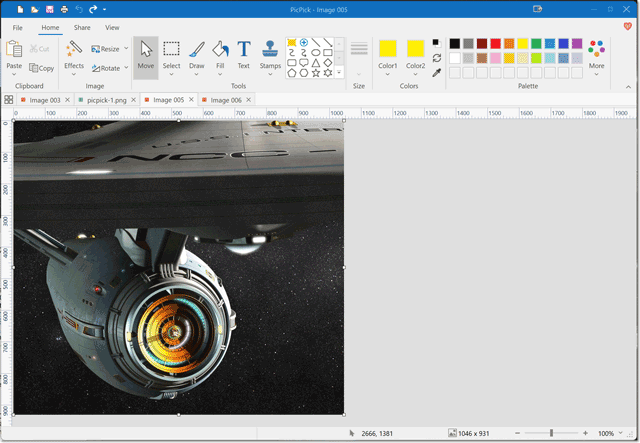
During my previous experience with macOS, I had tried a few free third-party options and settled on one that was satisfactory but not great.
This time around, I took a deeper look at the native screenshot utility. After watching some MacMost videos about macOS screen capture and annotation in Preview, I concluded that Apple’s built-in option was a suitable replacement for PicPick.
Generally speaking, the Preview app has been a happy surprise. On Windows, I had separate programs for screenshot annotation, reading PDFs, and merging/splitting PDFs. Preview handles all of those functions in just one app.
Note: I did need to find a screen ruler program. So far, Free Ruler has worked well for me.
Web Log Analysis Tool
For my personal websites, I’ve long had the habit of downloading the Apache access logs and running them through an offline web log analyzer to generate both standard and custom reports. On Windows, I used the program WebLog Expert. It provided me with metrics beyond what I could mine from Google Analytics or my web host’s analytics tool.
While still for sale, that program has been on life support for several years. Even on Windows, I couldn’t find a replacement. Ditto for macOS; I couldn’t find anything similar. Most log analyzers are meant for enterprise customers, so they are expensive and have steep learning curves.
I decided to take an end-around approach to solve this conundrum. I used Gemini to help me write a Python script to parse my Apache log files and generate CSV files for the three key custom reports I used to generate in WebLog Expert.
Python scripts are equally compatible with Windows and macOS, so problem solved.
Progressive Web Apps
In October 2018, Windows 10 added the ability to install progressive web apps as if they are traditional desktop apps. This means they run in their own window (versus in a regular browser window or tab) and also appear on the taskbar and in the Start menu. Over the years, I would run numerous Chrome-based web apps in this mode, including:
- Feedly (my RSS reader).
- Google apps like Keep and Sheets.
- Webmail clients.
- The web apps for my home security systems.

When I first considered moving from Windows to Mac, macOS didn’t fully support PWAs as standalone apps. However, by the time I was planning my M4 MacBook Pro purchase, this experience had become easy to achieve in Safari and Chrome, enabling me to add Feedly, Keep, and other PWAs to my Dock.

Web Browsers & Bookmark Sync
On my Dell laptop, I used Chrome as my primary browser but also used Edge and Firefox occasionally. On my iPhone and iPad, I primarily use Safari and Edge.
Switching to a Mac didn’t require me to change my browsing habits. (I rarely open Safari on my Mac.)
However, I did have to change my strategy for syncing bookmarks between my browsers and devices. For the details, see my post How to Use the Same Bookmarks Across All Browsers on Your iPhone, iPad & Mac.
Portable Apps
On Windows, I used portable apps when available to test drive apps, to keep my OS lean, to make uninstalling apps simple (just delete the folder), and to make upgrading my computer easier (just copy them). I rarely used them on thumb drives on other computers (which was their original intended use).
macOS has no equivalent concept, so I’ve left this practice behind. Installing and uninstalling apps is simple for most Mac programs, so I haven’t minded this change.
Data Backup
My Windows backup strategy involved cloud sync (e.g., Dropbox, OneDrive, and similar services), copying files to portable USB drives (via sync programs), and full disk image backups (also to portable drives). I kept remote copies of key backups either offsite (away from home) or in the cloud. My backup routine included daily, weekly, and monthly backups of different types.
As part of moving to Mac, my goal was to reimagine my backup routine and see if I could do things the Apple way. I landed somewhere in the middle.
- I still use cloud sync for key files (where they live on my Macintosh HD but auto-sync to OneDrive).
- I’m using Time Machine as my primary backup method (alternating between two drives).
- Daily, I also perform a manual file backup (e.g., of items like my Documents folder) to an SSD via FreeFileSync. (The same program is on Windows, but I had been a long-time user of SyncBackFree.)
- I use EaseUS Todo Backup to create weekly incremental file image backups of my Documents folder (which I upload to the cloud). Less frequently, I do the same for my Photos. The program isn’t well known on macOS, but I used the Windows version for years for full disk image backups.
I don’t create full disk image backups on my Mac since Time Machine serves the same function for disaster recovery.
Overall, my Mac backup routines take significantly less time to perform than my old Windows procedure.
Data Encryption
My data encryption strategies didn’t have to change much as a result of switching to macOS.
I had used BitLocker on Windows to prevent unauthorized access to my SSD from outside the operating system. FileVault on macOS serves the same purpose.
For further encrypting sensitive data, I planned to switch from VeraCrypt on Windows to native encrypted disk images on macOS. However, my research indicated that in a disaster recovery situation, VeraCrypt is more flexible since its secure containers can be opened on either Apple or Windows computers. By contrast, encrypted macOS disk images can be a challenge for Windows.
So, I decided to stick with VeraCrypt.
Security
On Windows, I ran various anti-virus programs over the years but eventually settled on the native Microsoft Defender app. Monthly, I’d also perform a scan in Malwarebytes. For VPN on my laptop (as well as on my iPhone and iPad), I used NordVPN.
On Macs, third-party AV programs aren’t as popular (and many feel they aren’t needed if you otherwise practice good security hygiene). So, I decided to skip installing a full-time AV program. However, I do run a monthly Malwarebytes scan on my Mac for good measure (and out of habit). NordVPN allows unlimited installs and usage on 10 simultaneous devices, so adopting it for my Mac was a no-brainer.

Other Migration Tidbits
One annoyance has not changed since I last used macOS in 2018. Application windows and desktop icons often move around when my MacBook wakes from sleep and/or when I disconnect from and reconnect to external monitors. I’m baffled that Apple has not solved this.
To save and restore my preferred window positions, I use Moom, a $15 third-party windows management utility. I can’t imagine using my Mac without it.

To wrangle my desktop icons when they go astray, I use the free utility Desktop Icon Manager.
I was surprised I couldn’t find a free S.M.A.R.T. Disk Monitoring utility for Mac (to replace CrystalDiskInfo, which I used on Windows).
Initially, I let my MacBook Pro automatically connect to my HP OfficeJet Pro 8600 Plus printer and didn’t install any drivers for it. I encountered numerous printing gremlins.
On letter-size paper, the printer insisted on printing double-sided, ignoring any setting I specified in the print dialog. To solve this problem, I discovered an obscure solution in an Apple Community discussion post. This YouTube video provides a how-to tutorial for using the Common UNIX Printing System (CUPS) web interface to adjust printer settings.
On labels, my HP would print only in best quality and not in draft quality (thereby wasting ink). The only way I could solve this problem was to download and install printer drivers from the HP Easy Start support site. Since doing that, the printer has behaved as expected.
Due to accidental foresight, I didn’t have to replace my external keyboard. The Keychron mechanical keyboard I’ve used since November 2023 originally came with a Mac keyboard layout (and replacement keys for Windows). So, I simply had to remove the Windows keys and restore the Mac keys.
Impressions So Far
I have absolutely no regrets about finally making the switch back to Mac. In fact, I quickly came to prefer the macOS user experience over Windows.
One big reason: the user interface congruity between macOS, iOS, and iPadOS. Switching between devices feels natural; the mail app is the same, the settings apps are similar, and the Messenger experience is identical (hallelujah!). Windows now feels foreign and jarring to me.
Continuity features add further synergy between my Apple devices. Universal Clipboard is much handier than emailing or messaging myself. Copying photos from my iPhone to my Mac via AirDrop is a delight compared to plugging my iPhone into a Windows computer via USB cable and then rooting around in the DCIM folder.
I don’t use iPhone Mirroring as much as I thought I would. I mirror mostly to grab 2FA codes since my authenticator app doesn’t have a desktop client.
Surprisingly, my fingers needed only a few days to develop muscle memory for the Mac keyboard layout. Now, I find it awkward to type in Windows.
My MacBook Pro is whisper-quiet. I haven’t heard the internal fan come on yet. By contrast, the fan on my Dell XPS laptop incessantly ran and caused quite a racket.
Conventional wisdom says that macOS is simpler than Windows and easier to use. I agree with the latter but not the former. I think macOS is just as complex as Windows; it just hides the complexity better. I’d also say that macOS offers far greater UI customization and flexibility than Windows. Apple usually provides many different options for performing the same action in macOS.
I’m tempted to conclude that I should have returned to macOS far sooner. However, I’m unsure how much to attribute my positive experience to Apple’s OS enhancements since I last used a Mac in 2018. Either way, I’m thrilled to be back in the Mac tribe and expect I’m here to stay.

Your Turn
Have you also switched back to macOS from Windows? I’d love to hear your story and any tips you might have.
(Note: I moderate all comments, so you may experience a delay before your comment appears on the post. For any SPAMMERS out there, don’t waste time submitting as I will reject your comment.)
SMARTReporter (https://www.corecode.io/smartreporter/).
Also, you don’t need to use iPhone Mirroring for authenticator apps – just use Universal Clipboard (works with Google Authenticator, Symantec VIP, etc).
Good point, and I do grab codes this way sometimes. But if my phone is in my pocket, sometimes I prefer to just startup mirroring instead.
If you like BusyCalendar, you really need to look at Setapp: https://setapp.com. $10 a month for access to over 250 apps, including the full versions of BusyCal, BusyContacts, & many others. I am not affiliated at all; just a very happy user.
Not using Apple Photos for organizing photos is mental. You miss one of the best photo experiences ever. And the list goes on for every third party software you use instead of the integrated apps. But welcome back.
Even if that’s true, you’re not taking into account the switching disruption. I’d have to declare bankruptcy on over 20 years of photo organization. I’d also be curious to hear from users who have used both PSE’s Organizers and Apple Photos.